

Introduction of Tile Installer
Tile Installer is an essential skill for anyone looking to improve their home or work environment. Whether you are updating your bathroom, installing a new kitchen floor, or creating a stylish backsplash, a tile installer plays a crucial role in ensuring that the tiles are placed perfectly, giving your space both function and style.
We will dive into the world of Tile Installer, breaking down everything you need to know—from the skills required to the tools used by professionals like tile setters and ceramic tiling experts.

Who is a Tile Installer?
A tile installer, also known as a tile setter, ceramic tiling expert, or flooring specialist, is a skilled professional responsible for the placement of tiles in various spaces. This job goes beyond simply laying tiles on the floor or wall. It requires precision, an eye for design, and Tile Store Near Me, an understanding of the materials being worked with.
Tile installation involves several steps, such as surface preparation, tile layout, applying adhesive, cutting tiles to fit, grouting, and finishing the job to perfection. Tile Installer experts must be well-versed in working with different types of tiles, including ceramic, porcelain, Bathroom Floor Tile, and natural stone.
The Essential Skills of a Tile Setter or Tile Installer
Being a successful tile setter or tiling technician means mastering several important skills:
- Attention to Detail: Tiles must be perfectly aligned, both visually and structurally. A small mistake can create uneven lines or gaps.
- Physical Stamina: Tile installation can be a physically demanding job, requiring the ability to stand for long periods, lift heavy materials, and perform tasks like kneeling or bending.
- Mathematical Skills: Understanding measurements and angles is crucial to ensure tiles fit correctly, especially when dealing with intricate patterns or layouts.
- Knowledge of Materials: A flooring specialist needs to understand the different types of tiles, adhesives, and grouts to choose the best options for the job.
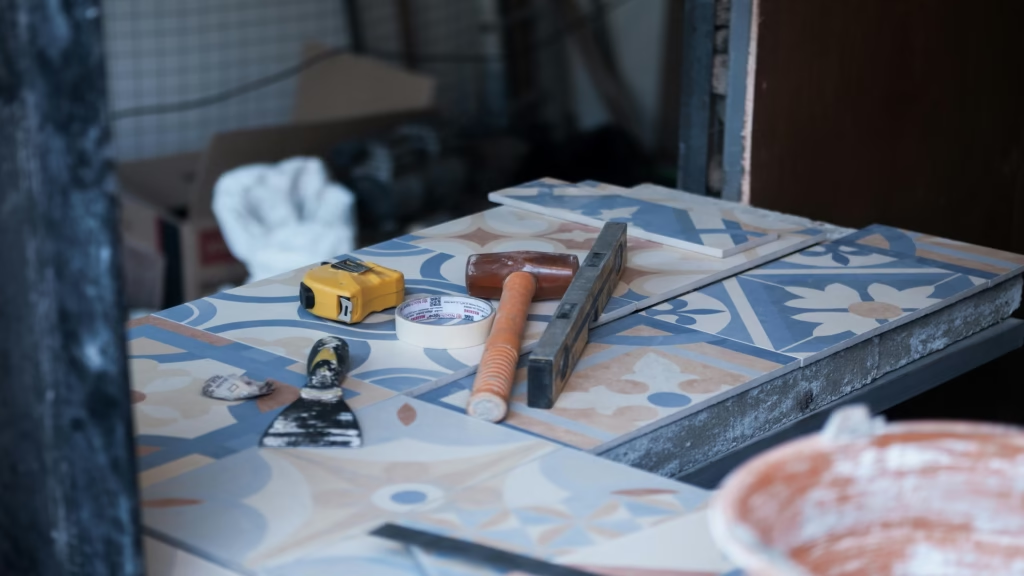
Tools of the Trade
Tile Installer requires several tools,each designed to make the process smoother and more efficient. A tiling craftsman uses these tools regularly:
- Tile Cutter: Used for cutting tiles to the desired size. For more complex cuts,a wet saw may be necessary.
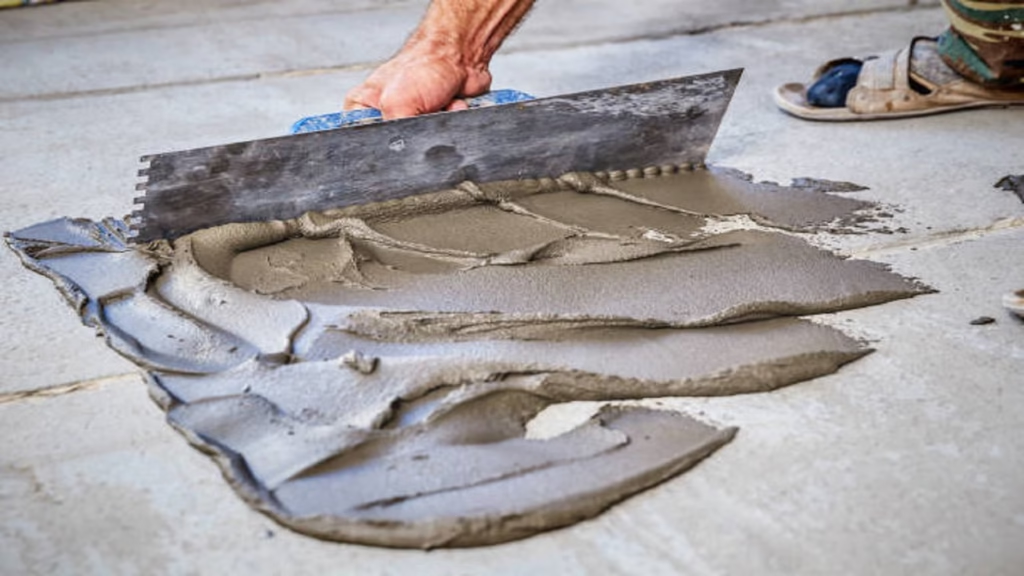
- Trowel: Used to spread adhesive evenly on the surface before laying the tiles.
- Grout Float: A tool used to apply grout between the tiles.
- Level: Ensures tiles are installed evenly and without any tilt.
- Rubber Mallet: Used to gently tap tiles into place without damaging them.
- Measuring Tape: For precise measurements to ensure tiles fit as planned.
Understanding Tile Types and Materials
A key part of a tile fitter’s job is understanding the different types of tiles they will work with. Each material has its unique qualities and requires specific installation methods. Here’s a breakdown of the most common types:
- Ceramic Tiles: Made from clay and baked at high temperatures,ceramic tiles are affordable, durable, and come in a wide variety of styles and colors. They are ideal for both floors and walls.
- Porcelain Tiles: A subtype of ceramic tiles, porcelain tiles are denser, more durable, and water-resistant. They are perfect for areas with high moisture levels, such as bathrooms.
- Natural Stone Tiles: Materials like granite, marble, and slate fall under this category. These tiles are luxurious but require more care during installation due to their varying textures and finishes.
The Tile Installation Process
The job of a tile installation expert can be broken down into several stages. Let’s go through them step by step:
- Surface Preparation: The area must be cleaned and leveled before laying any tiles. This might involve removing old tiles or repairing any damage to the surface.
- Measuring and Layout: Proper layout is essential for a symmetrical finish. A professional tile installer carefully measures the space and lays out tiles in a dry run to ensure the pattern works.
- Applying Adhesive: The adhesive is spread across the surface using a trowel. It must be applied evenly to ensure tiles bond properly.
- Laying the Tiles: Tiles are carefully placed one by one. A grouting specialist ensures that there is enough space between tiles for grout to fill in later.
- Cutting Tiles: Sometimes tiles need to be cut to fit specific areas, such as along the edges of the floor or around obstacles like pipes.
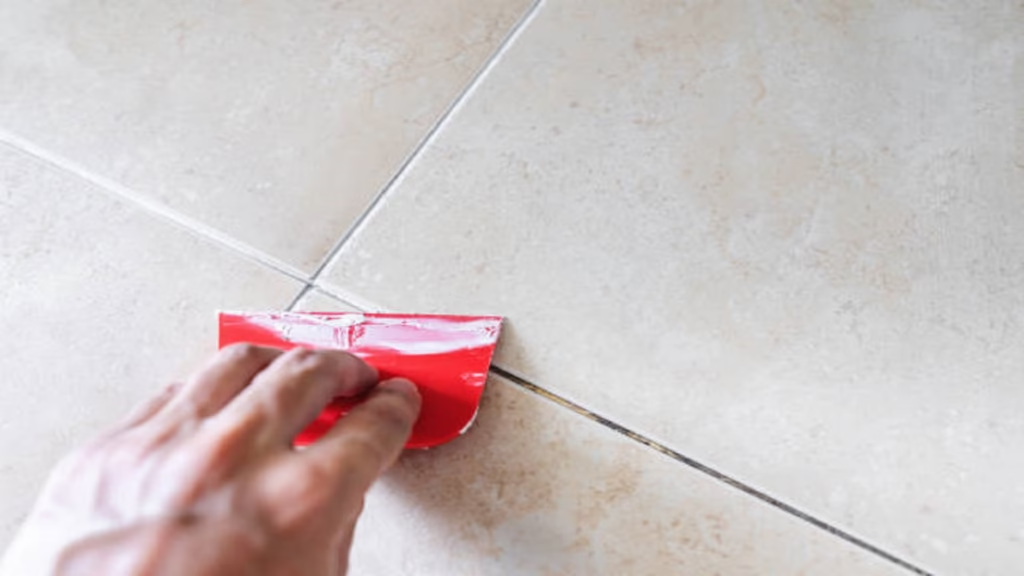
- Grouting: Once the tiles are in place, grout is applied between the tiles to hold them together and fill any gaps. The grout is carefully smoothed to create a seamless finish.
Why Choose a Professional Tile Contractor?
While DIY tile installation might seem tempting, hiring a professional tile contractor comes with several advantages:
- Expertise: A floor tiling professional has the skills and experience to ensure the job is done correctly, avoiding mistakes that could be costly to fix.
- Efficiency: Professional installers have the tools and knowledge to complete the job quickly without sacrificing quality.
- Long-Lasting Results: Proper installation ensures that tiles stay in place for years without cracking, shifting, or looking uneven.
- Warranty: Many tile installation experts offer warranties on their work, giving you peace of mind.
Common Mistakes to Avoid in Tile Installation
Even the most experienced tile fitter can make mistakes. Here are some common errors to watch out for:
- Not Preparing the Surface Properly: Installing tiles on an uneven or unclean surface can lead to them coming loose over time.
- Incorrect Tile Layout: Poor planning can result in unsightly gaps, especially along edges.
- Using the Wrong Adhesive or Grout: Different tiles require different adhesives. Using the wrong type can lead to tiles not sticking or grout cracking.
Grouting Techniques by a Grouting Specialist
A grouting specialist knows how to apply grout effectively to ensure the tiles stay in place and look neat. Here are a few tips:
- Don’t Overfill: When applying grout, don’t overfill the joints. This can lead to a messy finish.
- Clean Excess Grout: After applying grout, be sure to wipe off any excess before it hardens.
- Allow Proper Drying Time: Give the grout time to dry properly before walking on the floor or using the space.

Maintenance and Care of Tiled Surfaces
Once your tiles are installed, maintaining them is key to ensuring they last. Here are some tips from a tile installation expert:
- Regular Cleaning: Use a mild detergent to clean tiles, especially in high-traffic areas.
- Seal Grout: Grout is porous and can absorb dirt and moisture. Sealing it helps prevent stains and water damage.
- Check for Cracks: Regularly inspect the tiles for any cracks or chips that may need repairing.
Advanced Tile Installation Techniques
As you gain more experience, you may want to tackle more complex tile installations. Some of the advanced techniques that a tiling craftsman might use include:
- Mosaic Tile Installation: Mosaics involve placing small pieces of tile in a pattern. This can create intricate designs but requires precision and patience.
- Diagonal Tile Layout: Instead of laying tiles in a traditional grid pattern, you might opt for a diagonal layout, which creates a more dynamic look. This method often requires more cuts and careful planning.
- Tile Borders and Accents: Adding decorative borders or accent tiles around a main layout can create a more personalized look. This is popular in bathroom backsplashes and kitchen designs.
Tools for Advanced Tile Installation
As you advance in your tiling career, you’ll need specialized tools to help with these complex installations. These tools can help a tile fitter manage larger projects and intricate designs:
- Tile Nippers: These are essential for making small, detailed cuts on tiles, especially when creating mosaic designs.
- Wet Saw: A wet saw is vital for making straight cuts, especially on harder tiles like porcelain or natural stone.
- Tile Spacers: These small plastic pieces are used to maintain consistent gaps between tiles, ensuring even grout lines.
- Tiling Profile Edging: This type of tool helps to create a clean, professional edge around the installation area.
The Importance of Surface Preparation
Proper surface preparation is one of the most important steps in tile installation. An experienced tiling technician will always ensure that the surface is clean, dry, and free of imperfections before starting work. Here’s why surface preparation matters:
- Adhesive Bond: Tiles stick best when placed on a clean surface. Dust, dirt, and moisture can prevent the adhesive from bonding properly, leading to tiles lifting or sliding.
- Leveling: If the floor or wall is not level, your tiles will not sit evenly. A level surface prevents tiles from appearing crooked or uneven.
- Moisture Prevention: In areas like bathrooms, proper moisture control is crucial. Without the right surface treatment, water can seep underneath the tiles, causing mold or mildew to develop.
Working with Different Tile Materials
The tile materials you work with will dictate much of the installation process. A tile installation expert must understand the unique properties of each material to avoid complications. Here’s a quick guide to the most common tile types:
- Ceramic Tiles: These are the most popular tiles used in homes. They are easy to install and come in a variety of colors, patterns, and finishes. Ceramic tiles are perfect for beginners.
- Porcelain Tiles: Porcelain is denser and more durable than ceramic. It’s also more water-resistant, making it ideal for bathrooms, kitchens, and outdoor spaces. It requires a more precise cutting technique due to its hardness.
- Natural Stone Tiles: Materials like granite, marble, and limestone have an elegant appearance but require more careful handling. These tiles are often more expensive and need sealing to protect against stains and moisture.
- Glass Tiles: While visually stunning, glass tiles are delicate and may require special adhesive. They are often used in accent areas like backsplashes rather than floors due to their fragility.
Handling Difficult Tile Shapes and Cuts
Sometimes, a floor tiling professional has to work with non-standard shapes and cuts. This can happen when the tiles must fit around obstacles like pipes, electrical outlets, or irregular wall edges. Here’s how these challenges are handled:
- Making Irregular Cuts: For tiles that need to be cut around a pipe or odd corner, a wet saw is often the best tool. It’s also helpful to use a tile nipper for more detailed work.
- Laying Tiles in Tight Spaces: A skilled tile fitter knows how to deal with tight spaces by cutting tiles to size and ensuring that the finished installation looks cohesive and polished.
- Pattern Adjustments: When working with patterned tiles, the tile setter must carefully plan the layout to ensure that the pattern aligns correctly. This can involve cutting tiles into specific shapes to maintain the flow of the design.
The Role of a Professional Tile Contractor in Large Projects
While smaller tiling projects like kitchen backsplashes can be done by DIY enthusiasts, larger projects, such as whole-home tile installation or intricate bathroom designs, require the expertise of a professional tile contractor. Here’s why:
- Project Management: A professional can coordinate multiple workers, ensuring that the project is completed on time and within budget.
- Access to Better Materials: Contractors often have relationships with suppliers, giving them access to higher-quality materials at better prices.
- Licensing and Insurance: Professional contractors are licensed and insured, offering protection for you in case of mistakes or accidents.
- Complex Installations: If you’re working with custom tile designs or need to install tiles in non-standard spaces, a contractor can handle these advanced tasks with ease.
The Benefits of Hiring a Tiling Technician
If you’re considering whether to hire a tiling technician or do it yourself, there are several key benefits to hiring a professional:
- Expert Knowledge: Tiling technicians have the knowledge and experience to select the right materials, prepare surfaces correctly, and install tiles to last.
- Efficient Work: While DIY projects can take days or even weeks, a tile installation expert can often complete a job in a fraction of the time, ensuring that your space is ready to use quickly.
- Avoiding Mistakes: Mistakes in tile installation can be costly. Professionals have the training to avoid common issues, such as uneven tiles, incorrect grouting, and adhesive failures.

Maintenance Tips from a Tiling Expert
Once your tiles are installed, keeping them looking great requires a bit of maintenance. Here are some tips from a tiling craftsman:
- Routine Cleaning: Sweep or vacuum regularly to remove dirt and debris that can damage tiles or grout.
- Deep Cleaning: For deep stains or grime, use a gentle tile cleaner and avoid harsh chemicals that can damage the surface.
- Reapply Sealer: For porous tiles like natural stone, reapply sealer every few years to protect them from water damage and stains.
- Fix Cracks Quickly: If you notice a tile cracking, repair it immediately to prevent further damage to the surrounding tiles.
Cost Factors for Tile Installation
The cost of hiring a tile installer can vary greatly depending on several factors:
- Tile Type: More expensive tiles like natural stone or glass will increase the cost of installation.
- Project Size: Larger areas will cost more due to the increased amount of materials and labor.
- Labor Rates: Labor costs can vary by location and the experience of the installer.
- Additional Services: Extra services like surface preparation, sealing, or custom tile designs can increase the overall price.
Choosing the Right Tiles for Your Project
A floor tiling professional must not only understand the installation process but also know how to choose the right tiles for each project. Here are some factors to consider when selecting tiles:
- Room Functionality: The type of room greatly influences the tile choice. For instance, porcelain tiles are ideal for wet areas like bathrooms due to their water resistance, while ceramic tiles are excellent for areas with low moisture exposure like living rooms.
- Traffic Flow: In high-traffic areas like hallways and kitchens, choose tiles that are durable and can withstand wear. Tile setters often recommend glazed porcelain for these high-usage zones due to its strength and scratch resistance.
- Aesthetic Appeal: Tile style can transform a room. From sleek modern designs to rustic finishes, the visual appeal of the tiles can complement any décor. Consider how the color and texture of the tile will match the overall theme of the space.
- Size and Shape: Large tiles tend to make a space look bigger and cleaner, while smaller tiles or mosaic tiles add intricate detail and texture. The choice of shape can dramatically change the overall feel of the room.

Tile Installation and Environmental Considerations
Sustainability is becoming an important factor in the construction and home improvement industries, and tiling technicians are increasingly incorporating eco-friendly practices in their work. Here’s how to make your tile installation more environmentally friendly:
- Recycled Tiles: Many manufacturers now offer tiles made from recycled materials, reducing waste and promoting sustainability. These tiles can be just as durable and stylish as traditional options.
- Low-VOC Adhesives and Grouts: Volatile Organic Compounds (VOCs) found in adhesives and grouts can be harmful to both your health and the environment. Many installers now choose low-VOC or no-VOC products to minimize environmental impact.
- Energy-Efficient Installation: Consider using tiles that have natural insulating properties to reduce energy consumption in the home. Certain tiles, like those with cork or recycled rubber backing, can help maintain room temperatures and reduce heating and cooling costs.
The Importance of Grouting in Tile Installation
Grouting is one of the final steps in a tile installation expert’s work, and it’s a crucial one. Properly applied grout not only holds the tiles in place but also provides a finished look to the surface. Here’s why grouting matters:
- Preventing Moisture Penetration: Grout fills the gaps between tiles and prevents water from seeping through the joints. This is especially important in bathrooms and kitchens, where water exposure is common.
- Aesthetic Touch: The color of grout can complement the tiles, creating a cohesive look. Dark grout with light tiles creates a bold contrast, while matching grout and tile colors offer a seamless finish.
- Ease of Cleaning: A good grout job ensures that dirt and spills don’t get trapped in between tiles, making the surface easier to clean and maintain.
- Stain Resistance: Over time, grout can discolor due to stains or moisture. Sealing grout after installation can help protect it from discoloration and staining.
Common Mistakes in Tile Installation and How to Avoid Them
Even experienced tile installers can make mistakes, but knowing what common errors to watch out for can help you avoid them. Here are some common pitfalls:
- Not Using a Level: A perfectly level surface is crucial to achieving an even tile layout. If you don’t use a level to ensure your first row is straight, the entire tile pattern can end up misaligned.
- Incorrect Adhesive Use: Using the wrong adhesive or applying it incorrectly can result in tiles coming loose or uneven surfaces. A professional tile contractor will always ensure the right adhesive is used for each tile type.
- Over-Cutting Tiles: When making cuts around obstacles or edges, it’s easy to cut tiles too small or unevenly. Always measure and cut carefully to avoid mistakes that can’t be fixed.
- Neglecting Expansion Joints: Expansion joints allow the floor to expand and contract without damaging the tiles. Neglecting to add these joints can lead to cracked tiles.
How to Maintain and Repair Your Tile Floors
After your tile installation expert has completed the project, it’s important to know how to maintain and repair your tiles. Here’s how you can extend the life of your tile floors:
- Regular Cleaning: Sweep or vacuum regularly to remove dust and debris that could scratch the tile surface. Use a damp mop with a gentle floor cleaner for periodic cleaning.
- Sealing Grout: As mentioned earlier, grout is porous and can stain. Applying a grout sealer every year will help maintain its appearance and durability.
- Repairs: If a tile gets cracked or chipped, it’s important to replace it promptly to prevent further damage. A tiling technician can help with tile repairs by sourcing matching tiles and replacing the damaged piece.
- Re-Grouting: Over time, grout lines can wear out or discolor. Re-grouting your tiles can restore their original look and protect them from further damage.
Understanding Tile Flooring Costs
The cost of tile installation can vary depending on several factors, including the type of tile, the complexity of the project, and the experience of the floor tiling professional. Here’s a breakdown of the costs you can expect:
- Material Costs: The price of tiles varies greatly depending on the material. Ceramic tiles tend to be the most affordable, while natural stone or designer tiles can be significantly more expensive.
- Labor Costs: The labor rate for tile installation depends on location, experience, and the complexity of the job. On average, labor costs can range from $5 to $15 per square foot, though this can vary.
- Additional Costs: Remember to budget for materials like grout, adhesive, and surface preparation products. If you’re working with difficult spaces or custom designs, the costs may increase.
Hiring a Professional Tile Setter vs. DIY
As you explore the option of installing tiles yourself versus hiring a tile setter, it’s important to weigh the pros and cons. Here are some reasons why you might want to hire a professional:
- Expert Installation: A professional brings years of experience and training to the job. They’ll ensure the installation is flawless, reducing the chance of mistakes.
- Time-Saving: A tile installation expert will complete the job much faster than you would on your own, saving you valuable time.
- Access to Tools: Professional installers have specialized tools, such as wet saws and tile cutters, that can make the job much easier and more precise.
- Guarantees: Many tile installation professionals offer warranties on their work, giving you peace of mind that the job will be done correctly.
Author Remarks
In this guide, we’ve covered a variety of aspects related to becoming a skilled tile installer, from understanding the different types of tiles to mastering installation techniques and maintenance practices. Whether you’re a tiling craftsman taking on your next big project or a homeowner hiring a professional for the job, understanding the basics of tile installation will ensure your space looks beautiful and lasts for years.
A professional tile contractor is invaluable for larger or more complicated projects, but with the right tools, knowledge, and attention to detail, anyone can successfully install tiles and enjoy the benefits of a beautifully tiled space.
You made some decent points there. I appeared on the internet for the issue and located most individuals will go together with together with your website.
I reckon something really special in this website.